
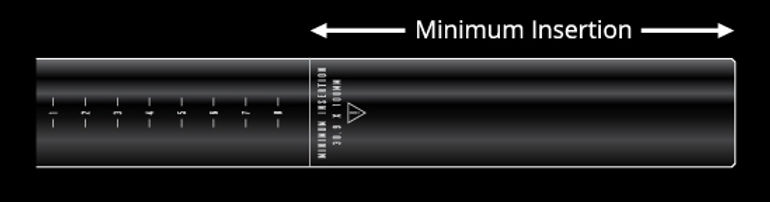
Make sure you choose the right size seatpost for your bike frame. This will invalidate your warranty and cause damage to your frame and dropper posts. You must ensure that your bicycle frame has an internal dropper post routing if you have selected an internally routed seatpost. You should not modify your frame to allow internal routing. This could cause frame failure and possibly death. For more information, please check Lynecomponents.com. Make sure that the seatpost is not inserted beyond the minimum insertion point. The recommended seatpost clamp torque for 8-10 Nm is best. Do not exceed this torque.
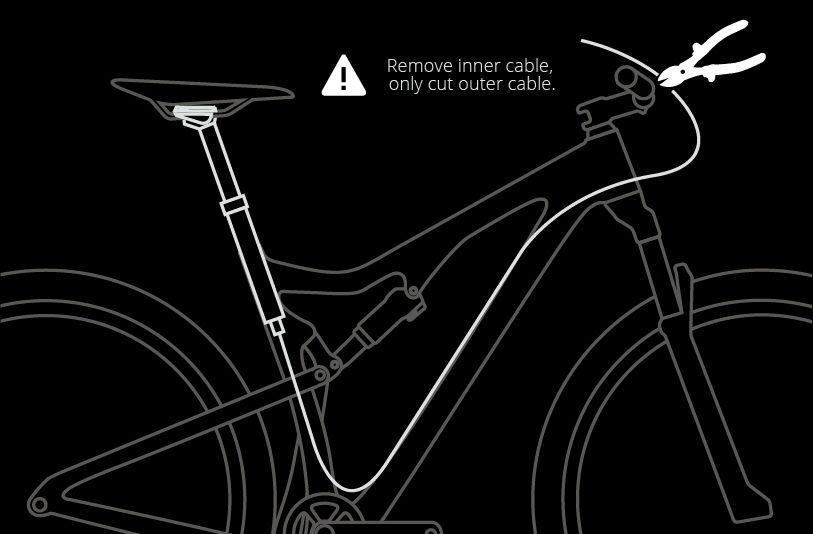
Step 1. Measure the length of cable outer housing starting at the dropper post and ending at the position you select for the remote lever. Sharp side cutters are used to cut the cable outer to the required length. You should leave enough cable at the handlebars for full 180deg movement. Please proceed to step 6 if you're using an external dropper pin and the standard length fits your frame.
Step 2. Make sure the hole in your lever puller Pin is correctly oriented. The cable end should be pulled into the slot in the lever puller Pin. Refer to the diagram below.
Step 3. Make sure the outer cables' plastic end caps are replaced. After that, thread the inner cable into it.
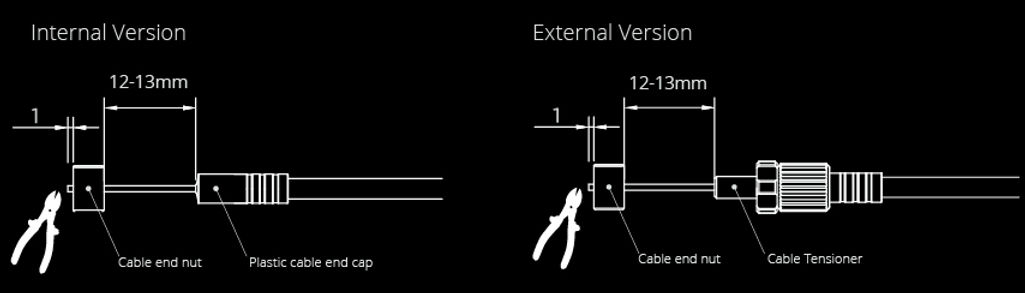
Step 4 (internal version). The inner cable should be inserted through the cable end nuts. The cable end nut should be placed 12-13mm from the plastic cap. Use a 2mm allen wrench to tighten the cable end nuts grub screws to secure the inner cable. To trim the remaining inner cables 1mm from the cable end nuts, use sharp side cutters and cable cutters.
Step 4 (External version). The inner cable should be inserted through the cable tensioner and cable end nuts. The cable end nut should be placed between 12-13mm and the cable tensioner. Use a 2mm allen wrench to tighten the cable end nuts grub screws to secure the inner cable. To trim the remaining inner cables 1mm from the cable end nuts, use sharp side cutters and cable cutters.
Step 5. The cable end nut can be attached to the dropper posts by sliding it into the slot. The cable outer fits into the recess of internal dropper posts (see diagram). External droppers require that the cable tensioner be installed and adjusted. You should ensure that the cable has approximately 1mm of play in cable.
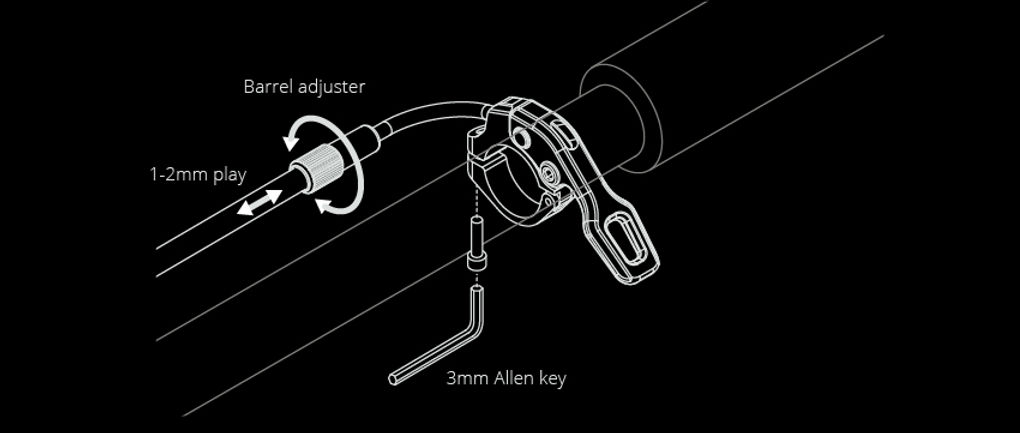
Step 6. Attach the remote lever to your handlebar and position it so that your thumb can press down on the lever. After the lever has been secured, the cable tension needs to be adjusted. You can adjust the tension using a barrel adjuster. Cable should have at least 1-2mm of play. It should not be held under tension. Tension that is too high can cause the dropper to act unintentionally.
Step 7. If necessary, cable tie the outer cable of your dropper post to the frame. It is not a good idea to leave loose cables that could interfere with moving parts
Step 8. Install the saddle. Post internally routed - Unfasten both clamp bolts to allow for the passage of the saddle rails. Place the saddle in the clamp, tighten the bolt and adjust the bolts to level it. Post externally routed - loosen the clamp bolt until there is enough space between the plates to allow for the inserting of the saddle rails. The clamp bolt should be tightened until the saddle is placed correctly.
You should not ride your bike aggressively until the dropper post is properly installed. Also, ensure that all bolts have been securely fastened to the saddle clamp or the seatpost clamp.
You can also read: Top 4 Best Hybrid Bikes


0 Comments